
Indice dei contenuti
Note: Version and Beta Features
⚠️ This guide covers the features in QZ Version 2.10
The developer, Roberto Viola, is working constantly to add new features and improve the QZ app. QZ users can support these efforts and get immediate access to the latest Beta features by becoming members on the developer’s Beta Program on Patreon or Buy Me a Coffee. Updates to the app are free, so users can also wait for the next full version to be available in your app store.
Note: Saving Changes
⚠️ When you change most settings you must reboot the app (close it completely) to save your changes.
USER INTERFACE
The first things you see on the screen when you open QZ: the icons in the top bar and in the Start/Stop row.
ℹ️ If you do not see the icons in the image below, you will need to click the 3 stacked lines at the top left of the screen and go to Settings>General UI Options and toggle ON “Top Bar Enabled”.
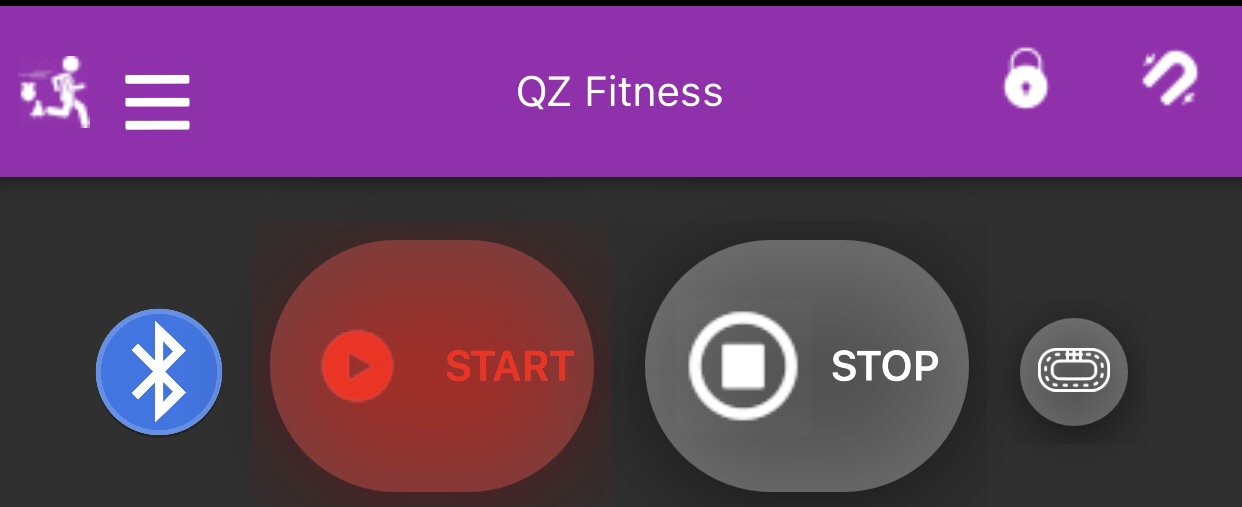
MAIN MENU takes you to the main menu.
PADLOCK: Allows the user to change the order of the tiles by dragging and dropping. Click PADLOCK to unlock the positioning of the metric display tiles. Slide your tiles into your preferred arrangement and then click the PADLOCK again to lock them in place. (See Choosing Your Tiles).
ℹ️ If you can’t see all the tiles on one screen (for example, if using a phone to run QZ):
- Go into Settings>General Options and change the UI Zoom setting to 75% or less so that all the tiles fit on your screen so you can easily arrange them.
- When finished, change the UI Zoom setting back to 100%, if desired.
- Quit and restart the app to activate the new settings.
MAGNET: The MAGNET is used to toggle ON and OFF QZ’s Auto-Resistance feature for use with third-party apps like Peloton and Zwift. QZ can control the resistance level setting on bikes and the incline and speed settings on treadmills that have the capability to change these settings digitally via FTMS Bluetooth. When toggled ON, you see the MAGNET icon. When toggled OFF, the magnet is replaced by a PAUSE icon. (See Table of Supported Equipment in the QZ Wiki.)
LAP: The LAP button allows the user to divide a ride or run into laps/sections and have QZ collect the data for the whole workout and the laps/sections separately. Use the LAP button as follows:
- Click START and then LAP when you start your ride.
- Click LAP when you finish the first segment.
- Click LAP again to start the next segment.
- When done, first click LAP and then click STOP to complete your workout. If you have entered your email into Settings>General Options, QZ will email a ride report, including the LAP data. If you connect QZ to your Strava account (See Main Menu), QZ will send the LAP data there, too.
START/PAUSE and STOP buttons: The button on the left toggles between START and PAUSE.
ℹ️ You can set QZ to always open in PAUSE mode (go to Settings > General Options and toggle ON “Pause when App Starts”) to better control the timing of a workout. This is important when syncing QZ’s timing with a Peloton class.
Click START when you are ready to start your workout and want QZ to start displaying and recording your metrics. Press STOP at the end of your workout to save the metrics to a .FIT file (and, if desired, to send the file to Strava). The .FIT file will be emailed with workout metrics and charts, if you have provided your email address in QZ settings.
BLUETOOTH: This icon will blink while it is searching for nearby Bluetooth devices. The app may display a variety of devices it finds and list them just below the START/STOP buttons as it finds them (including a Peloton class in progress on another device which it will track for you). IMPORTANT: It only matters that QZ connects to your equipment, not what device names appear.
You will know QZ has found your equipment when you see a series of tiles displayed on the screen (referred to as the dashboard) with different metrics in each. Be patient, it can take up to a minute to connect and display the tiles.
⚠️ Bluetooth Troubleshooting
- If QZ does not find your equipment, you can force it to connect to your device by going to Settings > Advanced Settings > Manual Device and then clicking “Disabled” and scrolling to find and click on your equipment from the list. Then click OK.
- If you do not see your equipment listed, click “Refresh Devices List” and check the list again. If you find it, select it and click OK.
- If your equipment still does not appear in the list, check the Bluetooth indicator (if any) on your equipment. If it is on, it is likely connected to another app or device.
- Turn Bluetooth off on any nearby Bluetooth devices such as tablets, phones or computers.
- Check the Bluetooth settings on the device running QZ to ensure the device and equipment are not connected, as this can block the QZ app from connecting to your equipment.
- Try quitting QZ, rebooting your equipment and devices, turning on your equipment and then opening QZ again.
Main Menu
Options under the MAIN MENU icon.
Profile: Allows you to create and save profiles for different use cases and/or multiple app users. (See Saving and Opening Settings and Profiles).
Settings: Takes you to the main list of settings for the user interface, personalization, equipment, tile display and much more. This will be addressed in the next section.
Swag Bag: Click to subscribe to QZ and support the developer.
Charts: Displays the charts for the workout in progress or a just-completed workout.
Open GPX: Loads a .GPX workout file into QZ to enable QZ to control the incline of your bike or treadmill based on the gradient information in the .GPX file. You can also select from a curated list of GPX files in this setting. To use these files, select one from the left side bar, press start and then select Map View from the top right corner.
Watch yourself travel through the mapped route from ground level or bird’s eye view. You can zoom in and stay behind your bike and QZ will follow you. Choose whether you want a 2D or 3D map in Main Menu > Maps. Watch this YouTube video for instructions and a demonstration of GPX map view in action.
Open Train Program: Loads a training program (.XML or .ZWO file), effectively making the QZ App a stand-alone fitness app. Click this setting to go to the QZ App folder in your File Folder (Android) or in the Files App (iOS) where you should save your .XML or .ZWO files.
Save GPX: Saves a .GPX file for use in other apps. For iOS users, the file will be stored in your Files app in the qdomyoszwift folder. For Android users, you will first need to download the CX File Explorer App from the Google Play store. Then using that app, navigate to Main Storage > Android > data > org.cagnulen.qdomyoszwift > Files > Profiles folder.
Save FIT: Saves a .FIT file for use in other apps. For iOS users, the file will be stored in your Files app. For Android users, you will first need to download the CX File Explorer App from the Google Play store. Then using that app, navigate to Main Storage > Android > data > org.cagnulen.qdomyoszwift > Files > Profiles folder.
Connect to Strava: Connects your Strava account to QZ so your workouts will be automatically exported to Strava. You will be asked to sign in to your Strava account and approve the connection.
Help: This currently links to the original QZ User Guide from January 2021 for Echelon and similar connected bikes but a complete guide is in progress. Eventually it will link to the new user guide website. Help can also be obtained by using this GitHub form for filing bug reports and making feature requests, or asking the QZ user community (see below) on the QZ Facebook page (always share which devices and equipment you are using).
Community: Links to the QZ user community and the app developer via the linked QZ Facebook group.
Credits: A thank you to, and list of, the developers of the app.
Version number: If you have a problem with the app, you will need to know and report this version number.
SETTINGS
Introduction to Settings
Settings are where you customize how QZ works, looks and interacts with your workout equipment, digital devices and third-party apps. You can change settings individually or save groups of settings (see Saving and Opening Profiles and Settings Schemes).
⚠️ 3 RULES YOU NEED TO KNOW⚠️
- If a setting has an OK button next to it, you must click OK to make the change.
- When you are done making changes you must completely quit QZ and reopen it to activate the changes. (How to completely quit an app on iOS devices).
- Each time the app restarts, it will retain the settings from the previous session.
Specific Settings Options
In this section we will explain each of the settings available when you click Settings.
General Options
Click to expand the bars to the right of General Options to see the settings options.
- UI Zoom: This changes the size of the tiles that display your metrics. The default is 100%. To fit more tiles on your screen, choose a smaller percentage. To make them larger, choose a percentage over 100%. Do not enter the percent symbol.
- Player Weight(kg): Enter your weight in kilograms so QZ can more accurately calculate calories burned. NOTE: If you choose to use miles as the unit for distance traveled, you will be asked to enter your weight in pounds (lbs).
- Player Age: Enter your age so that calories burned can be more accurately calculated.
- Gender: Select your gender so that calories burned can be more accurately calculated.
- FTP Value: If you train to specific output (or watts) levels, for example in Peloton Power Zone classes,and have taken an FTP test (Functional Threshold Power), enter your FTP here. This number is used to calculate your Power Zones (Zones 1 to 7 for Peloton and 1 to 6 for Zwift). You can learn about Power Zone Training here.
- Nickname: No need to enter data here. It is for a possible future QZ feature.
- Email: Enter your email address to receive an automated email with stats and charts when you hit STOP at the end of each workout. ⚠️Make sure there are no spaces before or after the email address; this is the most common reason the automated email is not sent.
ℹ️ Privacy Note: Email addresses are not collected by the developer and are only saved locally on your device. - Use Miles unit in UI: Turn on if you want QZ to display distance traveled in miles. Default is off and set to kilometers.
- Pause when App Starts: Turn on to set QZ to always open in PAUSE mode. This is important for Peloton classes so that you can sync the start of your QZ workout with the start of the Peloton class. Turn off to have QZ start tracking and timing your workout as soon as it opens.
- Continuous Moving: This option avoids your equipment “going to sleep” by allowing QZ to maintain a connection to your equipment. Turn this on for:
- Peloton Bootcamp classes or other workouts that are on and off the bike or treadmill. QZ will continue to track your workout even when you step away from your equipment.
- Capturing non-equipment-based workouts, such as yoga or strength training. ℹ️ NOTE: All such workouts are labeled as “Rides” in Strava, but you can edit the label in Strava.
ℹ️ You can save a Profile to switch to these non-equipment workouts (see Creating and Saving Profiles). For this feature to work you also need to turn on Settings >Experimental Features > Fake Device. Be sure to turn this setting off before your next regular bike ride or run.
Heart Rate Options
Expand the bars to the right to display the options under this setting.
- Heart Rate service outside FTMS: (For Android Version 10 and above, this setting cannot be changed. This setting can be changed for Android Version 9 and below and for iOS.) When this setting is turned off, QZ sends heart rate data in a format designed to improve compatibility with third-party apps, such as Zwift and Peloton. Default is off.
- Disable HRM from Equipment: Turn this on to prevent a built-in heart rate monitor (HRM) on your exercise equipment from sending that data to QZ. This allows QZ to connect to your external HRM, such as a chest band or Apple Watch.
- Disable KCal from Equipment: This prevents your bike or treadmill from sending its calories-burned calculation to QZ and defaults to QZ’s more accurate calculation.
- Heart Belt Name: If you are using a heart rate monitor (HRM) other than an Apple Watch, select your HRM from the list and click OK. (It needs to be on your body and generating a Bluetooth signal). ⚠️If you are using an Apple Watch as your HRM, leave this setting off and see instructions below.
To use an Apple Watch as your HRM, follow these steps in order:
- Start the QZ Apple Watch app on your watch.
- Open the QZ app on your iOS or Android device or computer. Your heart rate should register in the Heart Tile.
When you are done with your workout:
- Press Stop on the watch app.
- Press STOP on the QZ app. (If you do not do this, your workout data will show zero calories in the Apple Health app.)
⚠️Heart Rate Monitor (HRM) Bluetooth Troubleshooting
- If your HRM does not appear on the list, click Refresh Devices List, and try to select your monitor again.
- Ensure that your HRM is transmitting a Bluetooth signal. It is common that HRMs require their sensors to be moist before they are activated.
- Most HRMs can only connect to one device. If your HRM still does not appear on the list, check to see if your HRM is connected to other devices.
- Check your phone’s Bluetooth settings to see if the HRM is connected to your phone and if so, disconnect it. You want it to connect to QZ directly.
- Turn Bluetooth off on any nearby Bluetooth equipment or devices such as tablet, phone or computer.
- If you are using QZ on iOS, try turning off Settings > Experimental Features > iOS Heart Caching (please note this option is still under development).
- Try turning everything off, quitting QZ, turning on your equipment and then opening QZ again and selecting your HRM from the list again.
Heart Rate Zone Options
Expand the bars to the right to display the options under this setting.
- Choose the percentages for where you want your zones 1-4 to end and click OK. You can read about Heart Rate Zones here.
- Heart Rate Zone Training on treadmill or bike: Turn on “PID HR Zone” tile to make QZ control your treadmill or bike to keep you within a chosen Heart Rate Zone. See the instructions below under Settings >Tiles > PID HR Zone for more information.
Heart Rate Max Override
QZ uses a standard age-based calculation for maximum heart rate and then sets the heart rate zones based on that max heart rate. If you know your actual max heart rate (the highest your heart rate is known to reach), turn this option on and enter your actual max heart rate. Then click OK.
Power from Heart Rate Options
Expand the bars to the right to display the options under this setting. These settings are used to calculate power (watts) for bikes that do not have power meters. Instead QZ estimates power from your cadence and heart rate. You can calibrate how QZ calculates your power from heart rate as follows: If you know that at a stable pace you produce 100W of power at a heart rate of 150 BPM and 150W at 170 BPM, you can add these values under Sessions 1 and 2 Watt and HR and QZ will calculate your power based on that trend line.
Bike Options
Expand the bars to the right to display the options under this setting.
- Speed calculates on Power: QZ calculates speed based on your pedal cadence (RPMs). Enable this setting if you want your speed to be calculated based on your power output (watts), as Zwift and some other apps do. Default is off.
- Bike Weight: Enables QZ to include the weight of your bike when calculating speed. For example, if you are competing against yourself on VZfit, adding bike weight will “level the playing field” against your virtual self. If you have set QZ to calculate distance in miles, enter the bike weight in pounds (lbs). Default unit is kilograms (kgs).
- Zwift Workout/Erg Mode: Enable this setting ONLY when using Zwift in ERG (workout) Mode. To learn more about this, watch this Zwift video: https://youtu.be/5KIY3sBvaVs. QZ will communicate the target resistance (or automatically adjust your resistance if your bike has this capability) to match the target watts based on your cadence (RPM). In ERG Mode, the changes in road slope will not affect target resistance, as is the case in Simulation Mode. Default is off.
- Double Negative Inclination: Turn this on if you have a bike with inclination capabilities to fix Zwift’s bug that sends half-negative downhill inclination.
- Zwift Resistance Offset: This setting sets your “flat road” in Zwift. All communicated resistance changes will be based on this setting. The value entered is personal preference and will be dependent on your level of fitness. The suggested value for Echelon bikes is between 18 and 20. Default is 4.
- Zwift Resistance Gain: (for bikes and treadmills when using “treadmill as a bike” setting).
This setting scales the resistance from your bike or the speed from your treadmill before sending it to Zwift. Use this setting if you feel your speed in Zwift does not match your effort.
For example, a value of 1.25 will result in a 25% faster visual speed in Zwift, since this is determined by your resistance and cadence. Default is 1.
⚠️ NOTE: Any value above 1 is technically “gaming” or cheating, so you need to weigh the importance you place on virtual simulation vs. real world simulation.
- Zwift ERG Watt Up Filter: In ERG Mode, Zwift sends a “target output” request. If the output requested doesn’t match your current output (calculated using cadence and resistance level), your target resistance will change to help you get closer to the target output. If the filter is set to higher values, you will get less adjustment of the target resistance and you will have to increase your cadence to match the target output.
The Up and Down Watt Filter settings are the upper and lower margin before the adjustment of resistance is communicated. Example: if the up and down filters are set to 10 and the target output is 100 watts, a change of your resistance will only be communicated if your bike produces less than 90 Watts or more than 110 Watts. Default is 10.
- Zwift ERG Watt Down Filter: See above. Default is 10.
- ERG Min Resistance: Use this setting to set a minimum target resistance. For example, if you do not want to ride at a resistance below 25, enter a value of 25 and QZ will not set a target resistance below 25. Default is 0.
- ERG Max Resistance: Similar to the above, but sets a maximum target resistance. Default is 999.
- Resistance at Startup (only for bikes with electronically-controlled resistance): Enter the resistance level you want QZ to set at startup. Default is 1.
Bike Options (for specific brands and models)
Expand the bars to the right to display the options under this setting. Select your specific model (if it is listed) and leave all other settings on default. If you encounter problems or have a question about the QZ settings for your equipment, click here to open a support ticket on GitHub or ask the QZ community on the QZ Facebook Group.
ANT+ Options (for some Android devices)
- ANT+ Cadence: Turn this on if you need to use ANT+ along with Bluetooth. Power is also sent.
- ANT+ Heart: This setting enables receiving the heart rate from an external HRM over ANT+ instead of from QZ.
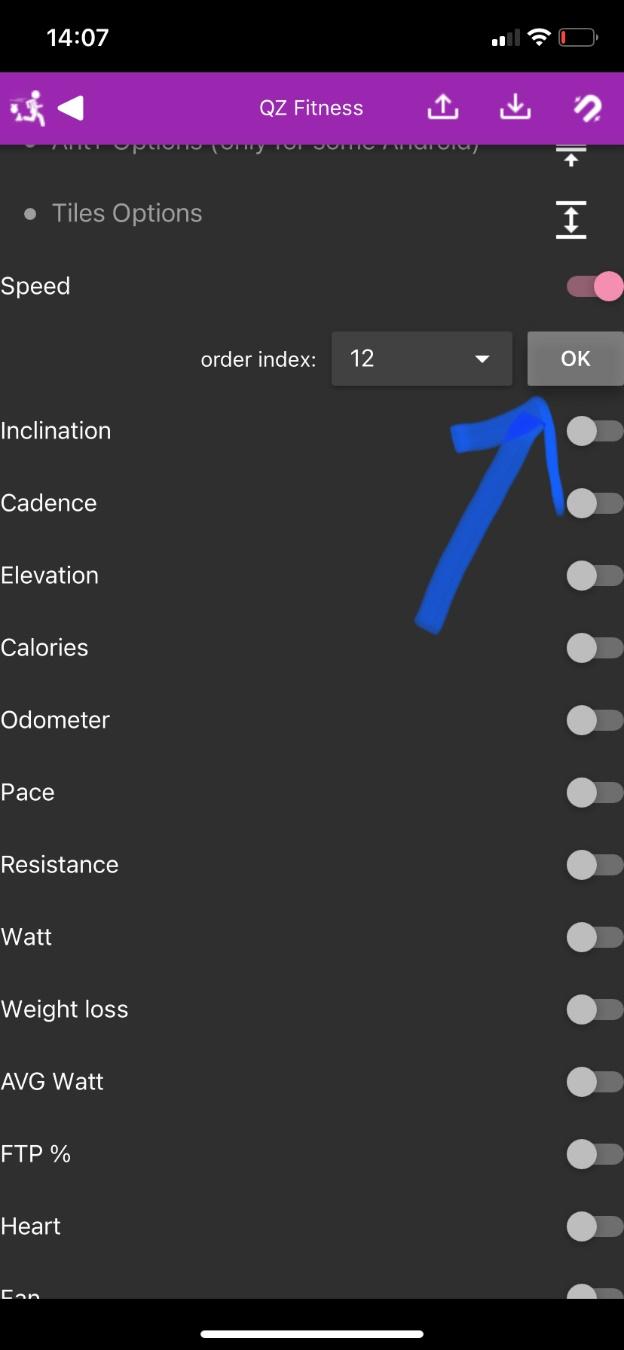
Tiles Options
Expand the bars to the right to display the options for tiles to be displayed. Tiles are used to display your workout metrics from your Bluetooth-connected exercise equipment and information received when connected to third-party fitness apps.
ℹ️ Regardless of which tiles you choose to display, QZ saves and reports all of the metrics it receives from your equipment, whether the tile is showing or not. All metrics and charts will be emailed at the end of your workout, if you have entered an email into QZ.
Instructions for selecting and organizing tiles follows this list of available tiles.
- Speed – Speed in kilometers per hour. (To set your speed units to miles, go to Settings > General Options > Use Miles unit in UI).
- Inclination – Treadmill incline (Treadmill only).
- Cadence – Bike pedal cadence in rotations per minute (RPM) or Treadmill cadence if a shoe-mounted cadence sensor or Apple Watch QZ app is used.
- Enable Cadence Color – Bike pedal cadence changes color to indicate how your cadence compares to the cadence called out in Peloton classes. The tile displays the following colors: white if there is no target cadence in the program, red if your cadence is lower than the target, green if your cadence matches the target, and orange if your cadence is higher than the target.
- Elevation – Total elevation gain (Bike only currently; Treadmill coming soon) if using Zwift or other connected app that communicates elevation).
- Calories – Estimated calories burned during session, calculated on weight, age, and watts.
- Odometer – Estimated distance traveled during the session.
- Pace – Current pace per mile or kilometer (Treadmill, Bike and Rower)
- Resistance – Displays your bike’s resistance. The +/- buttons can be used to change resistance, if your bike is compatible.
- Watt – Displays the watts generated by your current effort. Watt is also referred to as output (for example, in Peloton). If your equipment does not communicate watts, QZ will calculate watts using resistance and cadence.
- Weight loss – Estimation of weight loss during the session.
- AVG Watt – Average watts produced for the session.
- FTP % – Percentage of current FTP and current FTP zone. (Refer to Power Zones Section)
- Heart – Current heart rate. (Refer to Heart Rate Options Section)
- Fan – Built-in treadmill fan speed (Treadmill only)
- Joules – Cumulative power produced during the session in kilojoules.
- Elapsed – Total time from start of the session.
- Moving Time – Total time moving during the session.
- Peloton Offset – Allows you to sync resistance and cadence target changes with the Peloton coach’s callouts. If the targets are changing in QZ after the coach’s callouts, use the ‘+’ button to add seconds (essentially speeding QZ up). Use the ‘-’ button to slow QZ down. Use this tile in conjunction with the Remaining Time/Row tile (see below).
- Peloton Remaining – Displays time remaining in Peloton class.
- Lap Elapsed – Time elapsed in current lap. (See User Interface > Lap Icon section above)
- Peloton Resistance – Resistance of your bike converted to the Peloton bike scale of 1 to 100.
- Target Resistance – Displays target resistance in your bike’s resistance scale. For example, during a Peloton class or Zwift session, you want the resistance displayed in this tile to match the Resistance Tile (see above).
- Target Peloton Resistance – Displays target resistance converted to the Peloton bike scale of 1 to 100. For example, during a Peloton class, you want the resistance displayed in this tile to match the Peloton Resistance Tile (see above).
- Target Cadence – Displays target cadence.
- Target Power – Displays target output (watts) when this information is provided by third-party apps.
- Target Power Zone – Displays the target power zone when this information is provided by third-party apps. (Refer to Power Zones Section)
- Target Speed – (Treadmills only) Displays target speed.
- Target Incline – (Treadmills only) Displays target incline.
- Watt/Kg – Calculates your output (watts) divided by your weight. This is the primary metric used by Zwift and similar apps to calculate your virtual speed. NOTE: This is a much better metric to use than Output/Watts when comparing your effort to other users. This is why Peloton’s leaderboard, which uses only Output, is flawed.
- Gears – Allows you to change resistance while in Auto-Follow Mode.This tile allows you override the target resistance sent by third-party apps. For example, you would use the Gears Tile to increase resistance and generate more watts for sprinting in Zwift.
- Remaining Time/Row – Displays the time remaining until the next cadence and/or resistance interval.
- Next Rows – Displays the next Peloton interval with duration and FTP Zone (in Power Zone classes) or Peloton Resistance (non–Power Zone classes).
- METS – Displays metabolic equivalents (METs), a measurement of energy expenditure and amount of oxygen used by the body compared to the body at rest. (e.g., 4 METS requires the body to use 4 times as much oxygen than when at rest, which means it requires more energy and burns more calories). For more information: What Are METs, and How Are They Calculated?.
- Target METS – See above. This is set by Peloton.
- Time – Displays the current time.
- Strokes Count – (Rower only) Displays the number of strokes rowed.
- Strokes Length – (Rower only) Displays the stroke length.
- Steering Angle – (Elite Rizer only) Displays steering angle.
- PID HR zone – Use this tile to display the target heart rate zone in which you’ve chosen to work out in Settings > Training Program Options.
ℹ️ Peloton classes and HR Zone training: If you want to use Heart Rate Zone training with a Peloton treadmill class, turn off Settings > Peloton Options > Treadmill Speed Forcing. Peloton will control the Incline and QZ will control the speed to match your target heart rate zone. For Peloton bike classes, choose “NO” when the QZ Peloton class popup appears and asks if you want to follow the class. It has to be either QZ Heart Rate Zone or Peloton controlling resistance, not both.
You can read about Heart Rate Zones here. (PID stands for Proportional Integral Derivative).
- External Incline – (Elite Rizer only) Allows control of the incline of external inclination equipment.
- Stride Length – (requires a compatible footpod with accelerometer or Apple Watch with iOS 9; treadmill only) Displays stride while walking or running.
- Ground Contact – (requires a compatible footpod with accelerometer or Apple Watch with iOS 9;; treadmill only) Displays time foot is on contact with ground while walking or running.
- Vertical Oscillation – (requires a compatible footpod with accelerometer or Apple Watch with iOS 9;; treadmill only) Displays the up and down movement while walking or running.
Choosing and Organizing your Tiles
The QZ dashboard is completely customizable. First you choose the tiles that you wish to display and then you put them in the order you want to see them.
ℹ️ Regardless of which tiles you choose to display, QZ saves and reports all of the metrics it receives from your equipment, whether the tile is showing or not. All metrics and charts will be emailed at the end of your workout, if you have entered an email into QZ.
ℹ️ To organize tiles without being connected to equipment, turn on Settings > Experimental>Fake Device which will allow you to see the tiles as if you were connected to a bike.
Choosing Tiles to Display:
- Go to Settings > Tile Options and select a tile you want to display by clicking on the gray slider. The slider turns pink when enabled.

- Select the position of the tile using the order index menu. The order index starts with 0, so the tile with the order index of ‘0’ will appear in the top left corner of your dashboard.
- Click OK

Tile Ordering
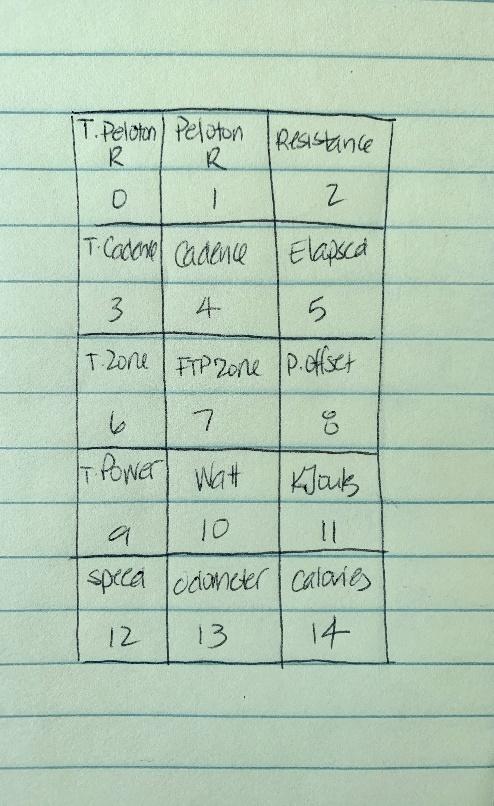
Now that you have chosen which tiles you want to display on your QZ dashboard, it is time to decide how you want them to display. There are two ways to organize enabled tiles on your QZ dashboard: 1) Numerically and 2) Drag and Drop (or a combination of both).
ℹ️ To adjust how many tiles can fit on your screen at one time you can decrease or increase their size by going to Settings > General Options > UI Zoom and choosing a percentage smaller or greater than default of 100%.
Ordering Tiles Numerically
Tiles are ordered from the top left of the QZ dashboard starting with 0; therefore, the tile with order index of ‘0’ will be the first tile on your dashboard (See handwritten tile map below).
- Decide which tiles you want to have displayed
- Determine the order you want your tiles to be displayed. It may be helpful to draw out your device screen on a piece of paper and then place all of the tiles you want in the correct location and number them, starting with zero.
- Toggle on each tile you want in the app and select the desired order index number
- Press OK after EVERY CHANGE.
- Completely quit the app and reopen. The tiles will be displayed when QZ connects to your equipment.

Ordering Tiles by Drag and Drop
⚠️Only the tiles that fit on the screen without scrolling can be moved using the drag and drop method.
- Go to Settings > General Options > UI Zoom and reduce the zoom to a percentage that will allow you to see all your enabled tiles on your dashboard, e.g., 65%. Click OK.
- Completely quit QZ to activate the changes.
- Turn on your equipment and open QZ.
- The tiles you have enabled will appear on your QZ dashboard when QZ successfully connects with your equipment.
- Drag and drop the tiles into the desired position .
- Click on the Padlock icon again to lock them in place when you are done.
- If you reduced the UI Zoom percentage to fit the tiles on one screen, return to Settings > General Options > UI Zoom, return the zoom to a percentage that allows you to see all the desired tiles on your dashboard and click OK.
- Completely quit the app and reopen.
See How to Create and Save Profiles to create customized arrangements for different equipment or uses.
General UI Options
Expand the bars to the right to display the options.
- Top Bar Enabled: Allows continuous display of the Start/Pause and Stop buttons across the top of the screen during your workouts. Default is on.
Peloton Options
These settings allow QZ to communicate with the Peloton app, access Peloton class information and display limited metrics on the class screen.
Displaying Metrics on Peloton Class Screen
- If QZ is connected to a heart rate monitor, heart rate will appear on the Peloton class screen.
- On iOS devices only, QZ can also display your bike’s cadence on the Peloton class screen. To display heart rate and/or cadence from QZ on the Peloton class screen (on iOS devices only), start and pause the class, swipe away the Here Now list of users and click on the screen. Click the Bluetooth icon from the list of icons that appear on the right to connect Peloton to QZ for these metrics.
Peloton Settings
Expand the bars to the right to display the options.
- Username: Enter the email address you use to login to Peloton (NOT your leaderboard name). Ensure there are no spaces before or after your email. Click OK.
- Password: Enter the password you use to login to Peloton. Click OK. If you have entered the correct login credentials and the QZ is able to access your account, you will see a ✅ when you reopen QZ. This is a secure login, not accessible by anyone but you.
- Difficulty: Typically, Peloton coaches call out a range for target incline, resistance and/or speed. Use this setting to choose the difficulty of the target QZ communicates. Difficulty level can be set to lower, upper or average. Click OK.
- PZP Username: As of 4/1/2022, this feature is broken due to a Power Zone Pack (PZP) website change. Leave (or change back to) the default of “username” (without quotation marks, all lowercase and all one word) until further notice.
- PZP Password: As of 4/1/2022, this feature is broken due to a Power Zone Pack (PZP) website change. Leave this setting blank until further notice.
- Conversion Gain: Conversion gain is a multiplier of the difference in resistance between Peloton and bikes that do not send resistance over Bluetooth (e.g. Schwinn and Bowflex). Use this setting to align the Peloton resistance calculated by QZ with the relative effort required by your bike. In most cases the default values will be correct.
- Conversion Offset: Increases the resistance that QZ displays in the Peloton Resistance tile. If QZ’s calculated conversion from your bike’s resistance scale to Peloton’s seems too low, the number you enter here will be added to the calculated resistance without increasing your effort or actual resistance. (Example: If QZ displays Peloton Resistance of 30 and you enter 5, QZ will display 35.)
- Cycling Cadence Sensor (Peloton Compatibility): Turn this on to send cadence to Peloton over Bluetooth. Default is off.
- Override HR Metric: By default, QZ communicates heart rate to Peloton. Use this setting to change the metric that appears on the Peloton screen.
- Date on Strava: Allows you to choose whether you would like the Peloton class air date to display before or after the class title on Strava.
- Activity Link in Strava: Turn this on if you want QZ to capture a link to the Peloton class and display it in Strava.
Training Program Options
QZ has a set of built-in training programs and you can also load and run training programs from Zwift .ZWO or .xml files (see Main Menu > Open Train Program above) or you can create your own workout in QZ.
The built-in training programs include:
- PID on Heart Rate (treadmill or bike): QZ controls your treadmill or bike to keep you within a chosen Heart Rate Zone. Turn on, set a target heart rate (HR) zone in which to train and click OK. For example, enter 2 to train in HR zone 2 and the treadmill will auto adjust the speed (or resistance on a bike) to maintain your heart rate in zone 2.
QZ gradually increases or decreases your speed (or bike resistance) in small increments every 40 seconds to reach and maintain your target HR zone. During a workout, you can display and use the ‘+’ and ‘-’ button on the PID HR Zone tile to change the target HR zone. - 1 Mile Pace (total time): Enter your 1 mile time goal, click OK. This setting will be used when you’re following a training program with the speed control. These settings should match also the Zwift app settings. More info: https://github.com/cagnulein/qdomyos-zwift/issues/609 and QZ gradually increases or decreases your speed (or bike resistance) in small increments every 40 seconds to reach and maintain your target time to complete one mile at the requested pace.
- 5 km Pace (total time): See 1 Mile Pace above; same except 5 km instead of 1 mile.
- 10 km Pace (total time): See 1 Mile Pace above; same except 10 km instead of 1 mile.
- Half Marathon Pace (total time): See 1 Mile Pace above; same except half marathon distance instead of 1 mile.
- Marathon Pace (total time): See 1 Mile Pace above; same except marathon distance instead of 1 mile.
- Default Pace: Select the default Pace to be used when the ZWO file does not indicate a precise pace.
- Training Program Random Options: Turn on and enter your choices for workout time (in minutes and seconds) and the maximum and minimum speed, incline (treadmill), and resistance (bike) and QZ will randomly change your speed and resistance or incline accordingly for the period of time you have selected.
Here are other ways to work with Training Programs in QZ:
- Open a ZWO file: ZWO file is the standard format for Zwift workouts. They are available to download on the internet from sites like https://whatsonzwift.com.
- Open an xml file: XML is a standard file that allows you to customize every aspect of a workout (including even the fan speed for example!)
- You can create a Random or HR-based workout by entering your times or choosing to turn on Random.
Treadmill Options
Expand the bars to the right to display the options.
- Treadmill as a bike: Turn on to convert your treadmill output to bike output when riding on Zwift. QZ sends your treadmill metrics to Zwift over Bluetooth so that you can participate as a bike rider. Default is off.
- Treadmill Speed Forcing: Turn this on to have QZ control the speed of your treadmill during Peloton classes based on the coach’s speed callouts. Your speed will be in the low, upper or average range based on your Peloton Options > Difficulty setting. Default is off.
- Pause When App Starts: Turn this on to have QZ go into Pause mode upon opening when using a treadmill. This is for treadmills only. Default is off.
- Speed Step: (Speed Tile) This controls the amount of the increase or decrease in the speed (in mph) when you press the plus or minus button in the Speed Tile. Default is 0.3.
- Inclination Step: (Incline Tile) This controls the amount of the increase or decrease in the inclination when you press the plus or minus button in the Incline Tile. Default is 0.5.
Treadmill (and Eliptical) Options (for specific brands and models)
Expand the bars to the right to display the options under this setting. Select your specific model (if it is listed) and leave all other settings on default. If you encounter problems or have a question about settings for your specific equipment with QZ, click here to open a support ticket on GitHub or ask the QZ community on the QZ Facebook Group.
Advanced Settings
Expand the bars to the right to display the options.
- Manual Device: Allows you to force QZ to connect to your equipment (see “Bluetooth Troubleshooting” below). Default is “Disabled.”
⚠️ Bluetooth Troubleshooting
- If QZ does not find your equipment, you can force it to connect to your device by going to Settings > Advanced Settings > Manual Device and then clicking Disabled and scrolling to find and click on your equipment from the list. Then click OK.
- If you do not see your equipment listed, click Refresh Devices List and check the list again. If you find it, select it and click OK.
- If your equipment still does not appear in the list, check the Bluetooth light (if any) on your equipment. If it is on, your equipment is probably connected to another app or device.
- Turn off Bluetooth on any nearby Bluetooth devices such as tablet, phone or computer.
- Check Settings > Bluetooth on the phone/tablet running QZ to see if your equipment is connected to the phone/tablet. If it is, disconnect it so that it will connect directly to QZ.
- Try quitting QZ, rebooting your equipment and devices, turning on your equipment and then opening QZ again.
- Watt Offset*: You can increase/decrease your watt output for moving your avatar faster/slower in Zwift or other similar apps as a way of calibrating your equipment. The number you enter as an Offset adds that amount to your watts.
- Watt Gain*: You can increase/decrease your watt output for moving your avatar faster/slower in Zwift or other similar apps as a way of calibrating your equipment. For example, to use a rower to cycle in Zwift, you could double your watt output to better match your cycling speed by entering 2. The number you enter is a multiplier applied to your actual watts.
- Speed Offset*: You can increase/decrease your speed for moving your avatar faster/slower in Zwift if your equipment outputs speed but not watts. The number you enter as an Offset adds that amount to your speed.
- Speed Gain*: You can increase/decrease your speed output for moving your avatar faster/slower in Zwift or other apps as a way of calibrating your equipment if your equipment outputs speed but not watts. For example, to use a rower to cycle in Zwift, you could double your speed output to better match your cycling speed. The number you enter is a multiplier applied to your actual speed.
- Cadence Offset: You can increase/decrease your cadence output. The number you enter as an Offset adds that amount to your cadence.
- Cadence Gain: You can increase/decrease your cadence output as a way of calibrating your equipment if your equipment outputs cadence but not watts. The number you enter is a multiplier applied to your actual cadence.
⚠️*Be aware! This may be considered cheating in Zwift. Also any adjustments you make will change the metrics/output that QZ reports for your speed and mileage. (For example, if Speed Gain is changed to “2” your mileage and speed will appear as doubled in QZ and Zwift.) - Strava Suffix Activity: Default is “QZ.” Please leave this set to default so that other Strava users will see the QZ; a tiny bit of advertising that helps promote the app and support its development. If you choose to remove it, please consider contributing to the developer’s Patreon or Buy Me a Coffee accounts to allow him to continue developing and supporting the app.
- Volume Buttons Change gears: Allows you to change resistance during auto-follow mode using the volume buttons of the device running QZ, Bluetooth headphones or a Bluetooth remote. Changes made using these external controls will be visible in the Gears tile. This is a VERY USEFUL feature! Default is off.
- Power Average 5 sec: If the power output/watts your equipment sends to QZ is quite variable, this setting will result in smoother Power Zone graphs. This is also helpful for use with Power Meter Pedals. Default is off.
- Instant Power on Pause: Enables the calculation of watts, even while in Pause mode. Default is off.
- Zwift Inclination Offset: Inclination Offset and Gain are used to adjust the incline set by Zwift instead of, or in addition to, using the QZ Zwift Gain setting. For example, when Zwift changes the incline to 1%, you can have your treadmill change to 2%. The number you enter as an offset adds to the inclination sent from Zwift or any other 3rd party app. Default is 0.
- Zwift Inclination Gain: The number you enter as a Gain is a multiplier applied to the inclination sent from Zwift or any other 3rd party app. Default is 1.
Accessories
Expand the bars to the right to display the options.
- Cadence Sensor Options (⚠️ Do not touch these settings if your bike is working properly!)
- Cadence Sensor as a Bike: If your bike doesn’t have Bluetooth, this setting allows you to use a cadence sensor so your bike will work with QZ. Default is off.
- Cadence Sensor: Use this setting to connect QZ to your cadence sensor. Default is Disabled.
- Wheel Ratio: Wheel ratio is the multiplier used by QZ to calculate your speed based on your cadence. For example, if you enter 1 for your wheel ratio and you are riding at a cadence of 30, QZ will display your speed as 30 km/h. The default of 0.33 is correct for most bikes.
- Power Sensor Options (⚠️ Do not touch these settings if your bike or treadmill are working properly!)
- Power Sensor as a Bike: If your bike doesn’t have Bluetooth, this setting allows you to use a power meter pedal sensor so your bike will work with QZ. Default is off.
- Power Sensor as a Treadmill: If your treadmill doesn’t have Bluetooth, this setting allows you to use a Stryde sensor (or similar) so your treadmill will work with QZ. Default is off.
- Doubling Cadence for Run: Some power sensors send cadence divided by 2. This setting will fix this behavior
- Power Sensor: Leave on Disabled or select from list of found Bluetooth devices.
- Elite Products
- Elite Rizer Options: Leave on Disabled or select from list of found Bluetooth devices
- Difficulty/Gain: Adjust if necessary and click OK. Default is 1.
- Elite Sterzo Smart: Leave on Disabled or select from list of found Bluetooth devices.
- SmartSpin2k device: Leave on Disabled or select from list of found Bluetooth devices.
- Shift Step: Adjust as needed for auto resistance. Default is 900.
- Advanced SmartSpin2K Calibration (See this Github page for more information.)
- Fitmetria Fitfan Options: These settings enable QZ to control fan speed and LEDs based on your workout power output or heartbeat. (See this Github page for more information)
- Enable
- Mode
- Min. value
- Max value
TTS (Text to Speech) Settings
Click to display the options. Enter the number of seconds you want between spoken summaries of your current statistics and turn on each of the statistics you want to hear spoken.
Maps
Click to display the options for the way maps will be displayed during an Open GPX training session (See Main Menu > Open GPX)
Experimental Features
Expand the bars to the right to display the options.
- Relaxed Bluetooth for mad devices: Leave this setting off unless Roberto asks you to turn it on during troubleshooting. Can improve the Android Bluetooth connection to Zwift. Default is off.
- Bluetooth hangs after 30m: Same as “Relaxed Bluetooth for mad devices”. Leave off unless Roberto asks you to turn it on. Default is off.
- Simulate Battery Service: Leave this off unless Roberto asks you to turn it on. Enables a new Bluetooth service, indicating the battery level of your device. Default is off.
- Enable Virtual Device: Enables QZ to communicate with third-party apps. Default is on.
- Virtual Device Bluetooth: Enables QZ to communicate with third-party apps via its virtual Bluetooth bridge. Default is on.
- Virtual Heart Only: Forces QZ to communicate ONLY the Heart Rate metric to third-party apps. Default is off.
- Virtual Echelon: Enables QZ to communicate with the Echelon app. This setting can only be used with iOS running QZ and iOS running the Echelon app. Default is off.
- Virtual Rower: Enables QZ to send a rower Bluetooth profile instead of a bike profile to third party apps that support rowing (examples: Kinomap and BitGym). This should be off for Zwift. Default is off.
- Zwift Force Resistance: Enables third-party apps to change the resistance of your equipment. Default is on.
- Bike Power Sensor: Do not use. This changes the virtual Bluetooth bridge from the standard FMTS to the Power Sensor interface. Default is off.
- Virtual iFit: Enables a virtual bluetooth bridge to the iFit App. This setting requires that at least one device be Android. For example, this setting does NOT work with QZ on iOS and iFit to iOS, but DOES work with QZ on iOS and iFit to Android.
- Wahoo Direct Connect: Enables a virtual WiFi bridge. Default is off.
- Run Cadence Sensor: Do not use. Forces the virtual Bluetooth bridge to send only the cadence information instead of the full FTMS metrics. Default is off.
- Template Settings: Only for developers.
- Android Wake Lock: Forces Android devices to remain awake while QZ is running. Default is on.
- iOS Peloton Workaround: ⚠️This MUST be always ON on an iOS device. Turning it OFF will lead to unexpected crashes of QZ. Default is on.
- Fake Device: Simulates QZ being connected to a bike. When this is turned on QZ will calculate KCal based on your heart rate. Examples of when to use this setting:
- To capture Peloton class data for classes without connected equipment (e.g., a strength or yoga workout)..
- To arrange tiles on the QZ dashboard without connecting to your equipment.
- To use the QZ Apple Watch app without connecting to your equipment.
- Fake Elliptical: Same as Fake Device but instead of simulating a bike it simulates an elliptical.
- iOS Heart Caching: Leave this on unless you have issues connecting your Bluetooth HRM to QZ . (Refer to Heart Rate Monitor Bluetooth Troubleshooting). If turning this off does not solve the connection issue, click here to open a support ticket on GitHub. Default is on.
- Debug log: Turn this on to save a debug log to your device for use when requesting help with a bug. To file a bug report: click here to open a support ticket on GitHub and attach your debug log.
- Clear History: Clears all the QZ logs, QZ .fit files and QZ images (these files are saved by QZ for every session) from your device while maintaining your saved Profiles and Settings.
Saving and Opening Profiles and Settings Schemes
⚠️ PROFILES are the new improved way to save groups of Settings. Settings schemes will remain available to create and use.
You can save PROFILES (or settings schemes) configured for different uses and/or users. Example 1: You can save one setup for cycling on Zwift and another for taking a Peloton treadmill class. Example 2: If you share QZ with another user, you can save separate profiles for each user, including unique login credentials and settings for the equipment and third-party apps they use. Example profiles: John-Bike-Peloton and Jane-Treadmill-Zwift.
How to Create and Save a Profile
- Before creating a profile, enter your user information and your credentials for other apps you want QZ to connect to and customize your settings and tiles. To customize:
- Turn on the workout equipment for which you wish to create a Profile and open QZ.
- When QZ connects to your equipment and the tiles appear, adjust the settings and tiles (See Tiles section for a guide to adjusting tiles).
- Click Profile. Create a new Profile by naming the current arrangement to describe your use case and/or user (eg John-Zwift-Bike) and click SAVE. You will get a popup notice saying the profile has been successfully saved.
- Click the newly created profile to select it and you will get a message asking if you want to Reboot QZ. Click Yes.
- Reopen QZ and it will have that profile selected and active.
How to Choose and Load a Profile
- Click Profile
- Click the expander bars and click a different saved profile from the list to select it.
- You will get a message asking if you want to Reboot QZ. Click Yes.
- QZ will reopen with that profile selected and active.
How to Export and Use a Saved Profile on Another Device
⚠️ For security reasons, when you transfer profiles to another device, your passwords for Peloton and Strava are not included in the file so make sure you have those available for entry on the other device.
- Navigate to the folder where your QZ profiles are stored. On iOS, open the Files App then navigate to QZ > Profiles folder. On Android you will first need to download the CX File Explorer App from the Google Play store. Then using that app, navigate to Main Storage > Android > data > org.cagnulen.qdomyoszwift > Files > Profiles folder.
- Select the profile(s) you want to export to QZ on another device and send them to yourself by attaching to an email or text message that you can open and download on the other device.
- Install QZ on your other device if it is not already installed.
- Download the profiles you sent to yourself and save them in the Profiles folder (in the same location in #1 above) on your other device.
- Open QZ on your other device and enter any missing passwords (for Peloton and Strava).
- Load the new profile (see How to Choose and Load a Profile above).
How to Rename or Delete a Saved Profile.
On iOS, open the Files App then navigate to QZ > Profiles folder and you will see your Profile listed.
- To rename the file, click and hold on the name. Choose Rename from the pop-up menu and name your new Profile file.
- To delete a profile, swipe left.
On Android you will first need to download the CX File Explorer App from the Google Play store. Then using that app navigate to Main Storage > Android > data > org.cagnulen.qdomyoszwift > Files > Profiles folder where you will find the Profiles you’ve saved.
- To rename the file, click in the check box and choose Rename from the bottom menu and name your new settings file.
- To delete a Profile, click in the check box and choose Delete from the bottom menu.
How to Create and Save a Settings Scheme
⚠️ Using PROFILES instead is recommended (see above). Profiles are the new improved way to save groups of Settings.
- Open QZ and turn on the equipment for which you wish to create a settings scheme. When QZ connects and the tiles appear, adjust the settings and tiles (See Tiles section for a guide to adjusting tiles).
- On the QZ home screen, click the 3-bar menu at the top left and click on Settings.
- You will see the 2 icons (above) with up and down arrows
- The up-arrow icon opens the QZ settings folder on your device to select a saved setting scheme and make it active on QZ.
- The down-arrow icon saves the current settings to a file on your device.
- Click the down-arrow to save your current settings. You will get a “Saved!” message.
- To change the name of your saved settings scheme:
- On iOS, open the Files App then navigate to QZ > Settings folder and you will see your file, named “Settings, current date, time.” To rename the file, click and hold on the name. Choose Rename from the pop-up menu and name your new settings file.
- On Android you will first need to download the CX File Explorer App from the Google Play store. Then using that app navigate to Main Storage > Android > data > org.cagnulen.qdomyoszwift > Files > Settings folder where you will find the settings files you’ve saved. To rename the file, click in the check box and choose Rename from the bottom menu and name your new settings file.
How to Choose and Load a Setting Scheme
- Open QZ, click the top 3-bar menu, click Settings, then click the up-arrow icon to open the settings folder.
- Click the bars to expand the Settings files menu then click on a saved settings name to select it (the name will turn yellow). Click again and you get the message “Settings has been loaded correctly. Restart the app.”
- Quit and reopen QZ and now you’re ready to start your workout with the loaded settings.
To Delete or Export a Settings Scheme to Another Device, see instructions above for Profiles, replacing “Profiles” folders and files with “Settings” folders and files.
Hey, does this work with Kickr Core and Zwift, to change the base resistance of the trainer ? Thanks
yes it does!
Thanks for the quick reply. So i tried to do it, but the resistance just keeps randomly changing. I cant use the arrows to control it. Same with inclination, i try to adjust it, but nothing happens. I tried disabling auto resistance, but still the same.
with zwift connected? you have to use the gears tile to add or remove resistance while zwift is connected
let me know
Ciao puoi spiegarmi come usare Kickr Core di zwift non riesco a farlo funzionare..
Grazie
Ciao Simone, hai seguito questa guida https://github.com/cagnulein/qdomyos-zwift/wiki/Virtual-Gearing-on-QZ-with-Zwift,-Rouvy,-Mywhoosh-and-Traning-Peaks ?
Hi Roberto,
Thank you for this great QZ-App. i used your app last winter connecting my echelon with Peloton App – worked great (iPhone running QZ paired with AppleWatch for heart rate, and another iphone with peloton app or macbook running Peloton in web browser).
Just restarted my winter workouts today, everything works well including the resistance synch., except my heart rate monitoring from Apple Watch.
When i start QZ App on the watch it does not indicate my hart rate (i wait almost 2 minutes – nothing). I uninstalled the app from watch and reinstalled again – no change.
Other heart rate apps work fine on my watch.
Any suggestions? Which setting should i verify?
My watch is an old Series 3 watch, running 8.8.1 iOS.
Thank you in advance
hi, double check that ALL the permissions for apple health for qz are enabled. let me know
That worked !!
THanks!!
great! Please remember to rate the app on the store, it means a lot to me! Also, if you want, please join the swag bag from the app to support the development!
Thanks!
Hi Roberto, I just downloaded and tried your app but it shows 65535 calories after first short run on a bike. This must be some error.
Any advices?
Hi! Which bike? Please follow this to create a debug log and add it to a ticket and I will check it, thanks! https://github.com/cagnulein/qdomyos-zwift/wiki/How-do-i-get-the-debug-log-in-case-something-doesn't-work%3F
Hi Roberto, I wonder if the Tunturi E60 upright bike is supported by QZ and auto resistance and ERG mode are working fine with E60 and ZWIFT.
The native connection E60 -> ZWIFT is fine but I have problem with the watt measurement and hill automatic resistance, so I wonder if the “Zwift gain multiplier” option (or something similar that I’ve seen in your app) would solve or mitigate the problem, and if your app would increase/decrease the e60 resistance when going uphill/downhill. Thanks!
Hi! Don’t know about this particular model, but create a ticket on github sending me a nrfconnect screenshot about it (nrfconnect is a free app on the store) and I will let you know!
Yes the zwift watt gain and also the zwift resistance offset setting can help you on this!
I can also add ERG mode if it’s not supported on your bike!
Let me know on github https://github.com/cagnulein/qdomyos-zwift/issues/new
Thanks, that was fast! I will do that ASAP.
Hi! I use Zwift a lot for cycling, but have just got a Reebok Jet100z treadmill. It connects to Zwift over Bluetooth, but I’m disappointed that Zwift doesn’t control the incline automatically – does QZ Fitness support this treadmill?
Thanks!
Yes it does!
Let me know if you have any questions
For auto inclination on qz you need the beta of qz
R.
Hi Roberto, Great App – Thank you!!
When i use QZ on my apple watch I occasionally experience weird thing: my watch stops recording my active calories throughout the day. For example… even in lazy day, my active calories are somwhere within 300-400 kcal, but today i only had 15 (!). It records calories during trainings with QZ, Strava and Apple workout., just nothing or very few in between workouts.
I had this several times this fall-winter, it gets back to normal after few days.
This did not happen all summer when i was not using Echelon/Peloton nor using QZ app.
I initially thought this was my watch (old series 3) but i just switched to series 9 last week and I am experiencing the same thing right now.
Have you notched something like that from other users? any settings i should check or change?
Thanks again for what you’ve done for the community. Keep going!
Qz can’t control the kcal outside the workout so it seems a bug of the watchos itself. Could you please send a screenshot to detail better your issue?
Hello,
I have a new king smith WPPRO treadmill. When QZ connects to it on my iPhone 13 the QZ app crashes within one second. I’ve tried using the QZ settings for king smith treadmills but there is no difference. The phone works fine with my Echelon bike and stays open with no equipment on. If turn on the treadmill QZ crashes as soon as it detects it.
What should I do? I love QZ
Already fixed in the beta, I’m sending you the fix
Hi. I have just downloaded the app to use with my Joroto x4s bike.
The app can find my bike through Bluetooth but when starting biking only the cadence tile changes. All other tiles like distance stay at zero. Am I doing something wrong?! I gave it a couple of minutes and it’s still the same.
create a ticket with a debug log and I will check it https://github.com/cagnulein/qdomyos-zwift/wiki/How-do-i-get-the-debug-log-in-case-something-doesn't-work%3F
Hi Roberto,
I just downloaded the app to connect my Wahoo Kickr with the Peloton app. The Kickr is connecting to QZ and QZ is detecting the Peloton workout. So all good there. The problems I am having are: I had expected the app to auto-adjust resistance in the Kickr based on the Peloton workout, but it doesn’t seem to be doing that. Also, the Cadence measurement is way off–I’m spinning at 60-70, but the app is showing 110-120. Have I missed some setup steps? Thanks
Hi! I guess I did some improvements for your trainer on the beta version. Are you on android or ios?
All is working properly, now. I must’ve not saved my previous settings, properly.
glad to hear it. let me know if you have any other questions
Hi Roberto,
I am a new user and love the app so far. I am just an old guy using the app as a better monitor for my Schwinn IC4 FTMS bike data and it works great! I have two questions regarding the chart feature. The data above the chart is average. Is the a way to make it live, showing the current cadence, heart rate and power? Also, the chart does not appear to be live but a snap shot of what was done prior to scrolling to the charts. If I go back to tiles and then back to chart, it updates all the data. Thanks
Hi! I added power chart for power zone workouts in real time in the beta and I can add others if you want. Create a ticket on github for this!
The app recognized my Bowlfex BXT116 immediately via bluetooth, but I can’t do anything with it. The bluetooth light on my treadmill is on when the app is open but none of the tiles do anything or receive any information from the treadmill. Also the “Start” button in the app is flashing red (not sure if that’s normal).
hi are you on android or ios? i guess you need the beta version
let me know
Hello, I appreciate you making this app and I am hopeful to get it working with my situation. I have an Echelon bike that will be a large paperweight without it.
I am trying to get QZ to work with Echelon / Rouvy combo.
QZ connects to the Echelon but after several minutes the bluetooth symbol on the app turns light blue and seems to stop working but is still connected to the bike. Does the symbol changing color mean something?
Then when I try to connect the phone with the QZ app installed, to Rouvy, it is recognized when I click on power meter connection but never successfully connects It just sits and spins.
I was able to successfully make it work with Zwift but then I started having trouble with My laptop not working with Zwift. I now have a brand new laptop that should be more than powerful enough to work with Zwift or Rouvy.
hi which phone do you have? is it an android? if so did you rename it to “bike” and rebooted? it could be a classic android issue
let me know
My phone is a Pixel 3 running Calyx
I tried changing name and Rouvy recognized as Bike but still would not connect. I am going to try Zwift again to see what happens
ok let me know
I tried Zwift and here is what happens:
I start the QZ App and connect to bike Echelon EX-4
I pedal and see the cadence change.
I start zwift and connect via bluetooth. “Bike” shows in the connect list I choose it and it immediately says connected no signal. eventually the QZ App stops responding and the cadence no longer changes.
let’s create a ticket with a debug log and i will check your case https://github.com/cagnulein/qdomyos-zwift/wiki/How-do-i-get-the-debug-log-in-case-something-doesn't-work%3F
Don’t you see the virtual wahoo device neither in zwift?
I think I am ok for now. Here is what I did.
-I tried connecting to Zwift with my Pixel 3 and basically had the same connecting with no signal.
-I downloaded and installed QZ on an old Samsung S8. I had to pay for the app again but no big deal.
-When using the Samsung S8 on Zwift, The Bluetooth still had the same issue (connected with no signal), but it recognized the phone as a Wahoo KICKR, so I tried connecting to that and it worked great!
-I tested it out for about 10 mins and it worked very well. Cadence, power and auto resistance all connected and worked.
-I then tried it on Rouvy and, unfortunately, it still does not connect.
-With the QZ app still running, I started another session on Swift and it once again connected as Wahoo KICKR and, worked very well. Hopefully it will continue to recognize and connect as Wahoo KICKR and I will be all set.
I was hoping Rouvy would work but I’ll be happy with Zwift for now.
Hi, it seems some issue on the zwift/rouvy side for Bluetooth. Is it a pc right? Which Bluetooth dongle are you using?
The Zwift/Rouvy software is installed on a MSI Gaming laptop with Bluetooth built in. QZ is on Samsung S8.
Mmm check this https://github.com/cagnulein/qdomyos-zwift/wiki/I-can't-connect-QZ-to-Zwift#for-zwift-pc-users
It could be your issue
I’ve been using the app for a couple of years with my Echelon EX3 and it’s been fine, but now now it does not show the cadence anymore? Any idea how to fix?
Also how do I connect my Garmin Epix, I have the QZ Companion app running on my watch but cannot see it in the device list?
Thanks
The cadence issue, if you didn’t change anything on qz, it’s a classic hardware failure on the bike. Check if also the echelon app does the same and if it’s so buy a cheap Bluetooth cadence sensor and you are good to go!
For the epic, do you want to see metrics there or only getting the HR?
remember to rate the app on the store! It means a lot to me!
Thanks!
Hi.
Tech dummy here.
I am trying to set up your app with a Bowflex VeloCore22 but I don’t seem to get a connection.
ANT+ Dongle for android is on the way and the goal is to connect the Garmin EPIX GEN2 to this as well.
Any (step-by-step) guide available?
Mille grazie.
Hi what do you see on qz? send me a screenshot to roberto.viola83 at gmail.com
You mean for the Bluetooth connection page?
i mean of the qz screen. i will guide you by email then
I have hooked the app upto zwift for running on a Domyos T900 treadmill. All data is being sent from the treadmil to the qz app and to zwift but the other way is not working. Zwift can not control the treadmill – no incline changes on any run free or workout and no speed changes if doing a workout. QZ app does control the treadmill if I manually change speeds etc but Zwift changes are not controlling the treadmill. Have I got some setting wrong or does this not work that way?
Are you on android or ios? You need to set the zwift credentials in qz to have auto incline. Check this also https://github.com/cagnulein/qdomyos-zwift/wiki/Can-Zwift-control-speed-and-or-inclination-of-my-treadmill%3F
hi there,
since yesterday i’m a new user from qdomyos zwift app to manage my zwift one hub.
i need to configure my zwift click – i enabled gear tile and set the gears gain property in the options, but i have no section “zwift options” to enable the zwift click. so at the moment i am not able to set gears.
but zwift click was found by the app while searching bluetooth devices.
it should be under accsessories, but it isn’t.
my device is iphone 15.
any help would be great.
Thx.
Hi! I just sent you a newer version by email! Let me know if you have any other questions
Hi there. I have a SARIS H3 trainer and I access Zwift via Apple TV. I am looking at virtual shifting – and using Zwift click. Can I do that if I use the QZ app? Thanks.
yes! qz on the phone and zwift on apple tv it’s perfect!
Hi, I have a macbook and iPad, a simple bike trainer. I am told I can use the QZ app to use mywhoosh work. What else do I need to get? a cadence sensor and a speed sensor or just one of the two (cadence or speed?) and which brand? I normally buy from amazon? thanks
Hi! Yes a cadence sensor and a heart sensor would be enough! Let me know if you have any other questions
Hi Roberto. Following a chat with cagnuelin on the garmin forum i have now purchased QZ app :o)) My set up is: Neo 2T, Garmin Heart Rate monitor strap, selected as “controlables & power” source in Zwift via Ant+ dongle, with Zwift on my lap top. I then run companion app via blue tooth on my phone. In order to get virtual shifting i am planning to purchase Zwift Click. And then follow the instructions in this video. Do you think this “setup” should be successful to enable me to get virtual shifting? Will i still select my Neo as controlable & power source via Ant+ dongle or will these be selected off the QZ app?
yes it works for sure! you need to select your tacx by ant+ as power and cadence but qz as resistance to have virtual gears! Let me know if you have any other questions!
Hi. I’ve just bought an Echelon bike and found recommendations for your app. I bought it, and have just tried it and it works well. The advice i need though is connecting it to Strava. When I click on the orange Connect to Strava box in your app settings I get the message in the photo. Can you please advise. Many thanks.
hi! toggle the strava auth setting in the advanced settings
let me know!
That did the trick. Realised you meant QZ advanced settings and found the Strava authority option and all connected. Will have a ride tomorrow and see what happens. Thank you.
Great! Please remember to rate the app on the store! It means a lot to me!
Thanks!
I just want to use my Zwift Ride with Kickr Core with Mywhoosh or Rouvy. Nothing else. Is this simple possible?
Yes of course! Are you on android or ios?
Android. How can I do this?
Download the app, join the beta https://play.google.com/apps/testing/org.cagnulen.qdomyoszwift and follow the wizard to connect also your zwift play controllers. Let me know if you have any other questions!
Ok thank you! I will try when mThanks! I’ll try it when my kit arrives. I hope virtual shifting will work without any problems not only in Zwift.y
In case let me know!
Is it possible to connect and use an AXS Pod to essentially change the gears virtually in the app?
Install the free app nrfconnect and show me a screenshot about it from this app and send me it to Roberto.viola83 at Gmail.com and I will add it for sure!
Perfect – just sent!
Hello, Any news on this?
thanks.
I don’t remember if the original user send me the information. Feel free to do the same and I will check it
Hi, I recently purchased the Wahoo Kicker core with the Swift Cog v2 with virtual shifting.
Virtual shifting is only working in the swift app. Now I want to check out other apps like ROUVY or BKOOL. Can I use your app as a workaround to use the virtual shifting within those apps?
Like I run ROUVY and use your app to shift the Swift Cog up and down a gear?
Thank you so much.
Kind regards,
Stefan
Yes exactly the purpose of the app! Let me know by email if you have any questions about the setup!
Hi,
does your App also works with Daum Ergobike TRS8008 ?
That would be grate!
Thanks and greetings from Austria
Walter
Hi! It should! To be sure, download the free app nrfconnect and show me a screenshot of the bike from it
Let me know
nrfconnect is to scan BLE Bluethoth – but my Ergobike 8008 don´t have Bluetooth!
So you can attach a cadence or power sensor to it to send metrics to qz! Let me know if you have questions in this setup
Stó provando Qz per Rouvy con la Zwift Bike e Wahoo kick Core . Ma non capisco , ho configurato secondo le istruzioni . Lo zwift play lampeggia sempre , Qz a cosa si deve agganciare al rullo o al zwift Play ? Le marce si cambiano dal manubrio o dall’applicazione? Esistono istruzioni dettagliate ? Ho acquistato sia android e ios
Ciao Angelo, qz si aggancia al kickr core e poi abilita zwift play sotto accessories in qz. Puoi trovare tutti i dettagli qui https://github.com/cagnulein/qdomyos-zwift/wiki/Virtual-Gearing-on-QZ-with-Zwift,-Rouvy,-Mywhoosh-and-Traning-Peaks
Le marce le cambi dai controlli dello zwift play ovviamente!
Hey,
I just bought a treadmill for the winter season. The QZ App reads the value from it but I cant change speed etc. in the UI, I also find my phone as a “Wahoo Tread” but the sync does not work. If I change the speed, its displayed in the App but Zwift does not recognize it.
I tried to turn “auto resistance” on and off and added my treadmill (I_TL) as a manual device in the advanced settings.
Which model is it?
Oh well that was fast.
Its a NordicTrack T Series 5.
I just checked the Nordictrack settings and didnt even found this specific model.
I added this last week. Are you on android or ios?
I am on an old android but can change to latest iOS if it helps with debugging.
Download the apk from here https://github.com/cagnulein/qdomyos-zwift/releases/download/nightly/android-debug.apk and select the t series 5 on the nordictrack treadmill settings
It’s a trial but I can unlock it if it works
The debug app works on the phone but still no sync to zwift.
Enable the android notification icon setting in the experimental settings and restart qz
Nope it doesnt work.
Zwift connects to “Wahoo tread” but does not recieve the speed.
Dont panic, I’ll check again in a few weeks.
Thank you for your patience
But are seeing it in qz?
Yes, its seen in the QZ App, I can change speed, inclination in the app.
In zwift its displayed as “wahoo tread” but it does not sync neither the speed and inclination.
I just checked the iOS version but the treadmill is not yet available in 2.17.0.
But are you talking about seeing speed on zwift or control it from zwift? If you are talking about seeing it, did you try also zwift on another device?
I just checked it on
Laptop with Windows 11
iPhone 15 with iOS 18.1.1
None of the devices worked
I suggest to open a ticket with a debug log https://github.com/cagnulein/qdomyos-zwift/wiki/How-do-i-get-the-debug-log-in-case-something-doesn't-work%3F
Bevause qz and zwift on the same device with the android notification icon setting enabled must work with the other default settings
Let me know
Rename also your android device to “run” only 3 letters and reboot it to.make it work with the iPhone and the laptop
Let me know
Switching the device’s name to “run” worked! I dont get it but its fine.
How can I continue using this early version of the app?
Is it possible to use QZ Fitness with a Windows or Mac app like Fulgaz?
Do you mean qz standalone or qz on mobile and fulgaz on pc or Mac?
Hello,
I would like to know if qz fitness app supports jetblack victory with Zift cog+click connection to Mywhoosh/Rouvy/IndieVelo?
Are there any limitations?
Best regards,
Matej
Yes full support! Let me know if you have any other questions
I own cycplus sensor c3, the app found the sensors but after several minutes no dashboard appears
Hi, it’s a cadence sensor? If so put it under the accessories settings, cadence sensor and also enable the cadence sensor as a bike setting. Let me know
I set it under the accessories settings and it works, great!
The sensor has double choice, it can be both cadence and speed.
Can the speed sensor be used somehow? Otherwise is speed always calculated from cadence?
Speed is always calculated by cadence and you can change the cadence ratio in the setting for this
I have an Echelon Bike. QZ installed on Ipad, can manage to get the bike connected because I can see the tiles.
I would like to use just the QZ app with the Bike (for basic metrics such as Speed, Distance, Calories etc.), however, no metrics get updated after I see the tiles.
Help is appreciated!
Did you set the bike under the manual device setting in the advanced settings? Could you please attach a screenshot of what you see? Let me know
Hello, is it possible to use the Zwift Cog on other apps like MyWhoosh on my Elite Direto XR-T? Thanks
yes!
What is the procedure to follow? Thank you very much.
Check this https://github.com/cagnulein/qdomyos-zwift/wiki/Virtual-Gearing-on-QZ-with-Zwift,-Rouvy,-Mywhoosh-and-Traning-Peaks
The tutorial doesn’t mention the Zwift Cog and Click. If I understand correctly, I can use the QZ app on my iPhone to make the Cog work on MyWhoosh with my Macbook?
Thanks a lot 🙂
Yes the cog is influent for qz since it’s directly change the virtual gearing on the trainer 🙂 so yes Qz on iPhone and cog on mywhoosh on your Mac!
Yes check this https://github.com/cagnulein/qdomyos-zwift/wiki/Virtual-Gearing-on-QZ-with-Zwift,-Rouvy,-Mywhoosh-and-Traning-Peaks
What is the procedure to follow? Thank you very much.
Hello,
I need help
Let me know which is your issue 🙂
I have installed the QZ Companion on my Nordic Track. After I open the QZ Companion I can choose my model X32i NTL39221. But I cannot find that same model number on the QZ App. Please help
You don’t need to set the same model on the qz main app, just set the ip of the treadmill under the 2950 ip setting and press OK
Okay! Ty
It worked! One last question. How to change from metric to imperial?
That’s great! Under general options in qz, miles unit
Please remember to rate the app on the store! It means a lot to me!
Thanks!
TY! Coffees on me. Merry Christmas
Thanks and merry Christmas!
i use qz on mywoosh and when the ride are uploaded on strava i see
“Garmin Edge 1080”.
Could i change this? There is a setting on qz?
That’s mywhoosh not qz writing that 🙂
Hello Robert. Happy New Year.
I have a question. If you use a dual power meter for training, what app do you use to measure pedal smoothness, real-time power balance or torque efficiency of the pedal? I’d appreciate any recommendations that are compatible with QZ app. I’m using an Assioma duo power meter (I recentely brought it from my friend, to increase my fitness level, not only loosing the body weight.
And during the past 7-8 months with QZ app, so I’ve had an amazing healthcare experience with a Schwinn 270 indoor bike. I’m came back to normal weight person from fatty person, I had lost more than 20kg. Thanks to you so much. I’m gotten a lot better. This is much much more worthy than the amount I just paid for QZ app. You saved my life. QZ is really good companion for my indoor workout.
Use the assioma for sure, you can set under the accessories, power sensor
Thank you for the answer, Robert. I already had connected assioma with QZ, and it worked fine. However, I could not find the function tiles like real-time pedal smoothness, real-time power balance or torque efficiency. That is the reason I just asked about above. “Jepster app” supports that functions via ANT+ connection with Assioma Power Meter, but I want to use QZ app because I like, am familar with QZ app very much.
Hi, I didn’t implement them yet and I don’t think they are broadcasting this over Bluetooth but I have to find in the documentation.
Create a ticket and I will check it https://github.com/cagnulein/qdomyos-zwift/wiki/How-do-i-get-the-debug-log-in-case-something-doesn't-work%3F
Hi Roberto,
A simple question. I can connect my Wahoo and QZ without problem but I cannot connect Rouvy to QZ. Instruction say ‘select Rouvy as your preferred fitness platform i qz app’. where in the app do i make this selection please.
many thanks
Glyn
Hi, are you running rouvy on a separate device?
Hi Roberto,
I’m so happy with the app. I thought this idea was pretty cool so I wanted to share it with you. I’m using a set of apple headphones to change gears using the volume control. I’ve simply used double sided tape to attach the volume bar to the side of the shifters. I’ve also attached a couple of small hex nuts to the + and – buttons so that I can easily feel where to press. Just a light touch is all it needs. I’m finding it better than the Zwift click because the buttons are now in a natural shifting position. Couple of photos attached. Cheers Ian
Amazing! Please remember to rate the app on the store and if you can join the swag bag from the app! Thanks!
I downloaded the app and installed it on Android 15 (Pixel 6 PRO)
Toggled the Zwift click on, set the gears gain to 0.1 and restarted the QZ app. The Click is connected with my phone with bluetooth and using MyWhoosh on a Macbook.
When I press the + pr – button the gears tile is not changing, when I press it manually it works fine.
I also have the Zwift Play because have a Zwift ride, but also when I toggle the Zwift play instead of the Zwift click het the same problem.
Do you know what I’m doing wrong?
Click with firmware updated? It’s mandatory. Also are you waking the click up before starting qz?
Is this app compatible with the Bowflex IC SE? I see that it works with the Bowflex C6, which is a similar model.
Yes it does!
Hello Robert,
My configuration is , iPhone 15pro for QZ , iPad Pro for Rouvy , Zwift bike and Wahoo Kickr. i spend the whole morning to try to run Rouvy with the help of QZ and virtual shifting. I can not get this done. There is so much information on the internet and it confuses me. I tried the tutorial you provided in the Youtube Zwift Play or Zwift Click for Virtual Gear on any bike! posted by YouTube·Roberto Viola·17 feb 2024 but i could not get it working. Could you please tell me in a few simple steps how to get it working. Kind regards , Bob
Hi did you check this https://github.com/cagnulein/qdomyos-zwift/wiki/Virtual-Gearing-on-QZ-with-Zwift,-Rouvy,-Mywhoosh-and-Traning-Peaks
The Only setting from the default that you have to do is to enable the zwift play setting in qz
Let me know
Thanks for the speedy awnser , i got to this part ‘You can validate if your Zwift Play is working correctly with QZ by clicking the Zwift Play gear buttons and watching the gear tile – it should show the gear moving up or down accordingly.’ and only the gear moving up is working and not the down button. Also i could not notice any effect with the gear shift in the rouvy app while cycling. Then i got to this part ” Bluetooth Remote
Pair it to your phone etc.’ i can not find anything like this in the QZ app
Are the play firmware update from the zwift companion app?
On rouvy did you set qz as controllable too? Show me a picture of how you are pairing qz to rouvy
Firmware is up to date. Where is this option in rouvy to set qz ? ican’t find it
On rouvy did you select the trainer or qz? You have to select qz (you will see it as a phone name)
Yes there are 2 options for the smart trainer and the Kickr was selected and now i changed it in to my iPhone name. Whats next?
Ok selecting the iphone will able qz to handle gears and inclination
Now show me a debug log on a ticket to understand your issue about the zwift play that doesn’t count in both directions https://github.com/cagnulein/qdomyos-zwift/wiki/How-do-i-get-the-debug-log-in-case-something-doesn't-work%3F
Strange , as i tried to recreate the problem it suddenly works, so this is no problem anymore.
Allright , i am having a lunch break now and will contact you later on. One other thing, the tiles gear up and down are displayed on the bottom of my phone display and i want to move them up but if i unlock the slot it also disables the movement and if i scroll down first to the bottom the upper line , wiith the lock disappears.
You can move them acting on the order index in the tiles settings
Found ! Whats next to get it working?
Now enjoy virtual gears on rouvy 🙂 are you able on android or ios?
ios
Ok so I just sent you by email a newer version, let me know!
Hello,
Can you please help me with how the app works?
I’m having problems with the following: I start cycling on my Domyos EB900, then I start QZ and when I try to use a workout on Kinomap it doesn’t connect to the bike.
Is that really the case or am I doing something wrong? Shouldn’t the Kinomap connect to the bike?
For kinomap you can use the bike directly without qz. Did you try this?
I don’t understand, I don’t need qz?
How does it work? If I connect qz first, kinomap doesn’t connect, if I connect kinomap, qz doesn’t connect. Can you explain to me how to do it? I’ve just bought the app.
Qz allows your bike to connect to zwift or mywhoosh or rovuy for example. So let me understand : do you see the metrics on qz from your bike?
I’d like to say that I use kinomap on one device and qz on another.
Ok but do you see the metrics on qz?
Yes
Are you on android with qz? Did you try to rename the phone to bike in the android settings and reboot it?
O que tenho é um Xiaomi 13T com a qz e um Samsung A03 com a Kinomap.
Mudar o nome do telefone como? Nas definições do Bluetooth?
Consegues dizer passo a passo como devo fazer?
The xiaomi. From the android settings. System information usually
Anyway for kinomap I suggest to contact kinomap directly because it has to work directly
So maybe there is a kinomap bug
The normaly is start first qz in 1st device and them the kinomap in the 2nd device, right?
Or can I use the two apps in same device?
Yes it’s the right process. But first rename the phone name as I said. Also on kinomap select ftms bike
I’ve already selected Kinomap ftms bike and it’s connected but when I try to do a workout Kinomap doesn’t start.
On Xiaomi I’ve already changed the name of the phone. You had asked if I used qz with zwift or mywhoosh or rovuy, I didn’t because I don’t think Domyos is compatible with those applications.
Qz will allow to use zwift and the other apps that’s why I said so because I’m guessing it’s a kinomap bug. Try zwift
OK, but I have to use ftms bike, right?
I’ll give it a try, then I’ll let you know.
On qz? Leave as it is if you see the metrics
No, on zwift.
You don’t have any selection on zwift, it’s straightforward
Hello again,
I try with rouvy and it´s the same problem like Kinomap.
I think the problem must be with the bike console, which must have a Bluetooth version that isn’t compatible with any application.
I can’t believe that the problems are with the phones. I’ve tried it with a Mac and the same thing happens.
I haven’t tested it with Zwift, but the same thing should happen.
Trust me try with zwift first of all. Qz on a device and zwift on another. You will see your phone or wahoo kickr virtual device. I have more than 100k users with this setup 🙂
Bom dia,
Infelizmente nem a zwift trabalha. Consigo que ela funcione e reconheça a bicicleta sem a qz a funcionar.
Quando faço o processo normal de ligar a qz e depois a zwift nunca reconhece a bicicleta. Acontece o mesmo que a KInomap e a Rouvy.
Começo a achar que o problema possa estar nos smartphones.
Como tenho a qz instalada no Xiaomi existe alguma hipótese de instalar a qz noutro telefone para testar?
Ter a qz no Samsung e a zwift no Xiaomi?
With the same license you can install on any phone you want. Anyway enable the android notification icon setting in the experimental settings in qz and use zwift on the same phone. It must works for sure
Queres dizer que nesse caso a qz trabalha em segundo plano, certo?
Ligo a qz e depois a zwift no mesmo telefone.
Desculpa estas perguntas todas mas é muito estranho para mim nada funcionar.
Exactly
Tudo na mesma. Quando a qz está a funcionar a zwift não reconhece a bike.
Show me what you see on zwift on the pairing screen with qz on background with the android notification icon setting enabled as I said
Aqui estão algumas fotos
Mais fotos
Como só dá para anexar uma imagem de cada vez, anexo um ficheiro Word com todas as imagens
Fotos
You have to select the wahoo kcirk as I said
Agora parece que sim, está a funcionar.
Tenho pena que não funcione com a kinomap
Obrigado
For kinomap contact their support. It’s their fault. Please rate qz and the support on the store. It means a lot to me. Thank you
Hi there – I have a Bodytone Smartbike SMB1v3 and the resistance is random when using Zwift. Is there a setting which I can adjust? Thank you.
Maybe you enabled by mistake the random training program setting in qz? Otherwise create a ticket with a debug log and I will check it https://github.com/cagnulein/qdomyos-zwift/wiki/How-do-i-get-the-debug-log-in-case-something-doesn't-work%3F
Hi Roberto,
Happy New Year!
I’ve been using QZ for several years and i’ve been very happy with the app – thank you for doing this for the comunity.
Question: How do I switch Peloton accounts which the App is using on my iPhone? It was easy to change the username and password in older versions, but how am i supposed to do that with ‘Connect with PELOTON’ feature? (I already logged in to PELOTON app with different credentials, but QZ still uses the prior login). what am i missing?
Hi, happy new year! Toggle the strava Auth setting in the advanced settings so it will open the browser to do so.
Of course you have to logout from the browser so you can have a login prompt again
Let me know
Hi Roberto,
Many thanks for the great app!
I’m having trouble trying to connect qz fitness to my Garmin account. I’ve put in my Garmin Connect username and password. After I clicked on the “Test Garmin Login” button, I got an error message “Garmin Connect: Login failed. Host requires authentication”. See the bottom of the screenshot.
Both qz fintess and Garmin Connect are on the same phone. Did I miss any setting to make it work?
Did you enable the 2fa on your garmin account?
Yes, I need to enter a verification code sent to my email to log into Garmin Connect, and it seems I can’t disable it. Is that a problem?
Ok so did you add the mfa in qz when it asked? That popup is after this?
I didn’t see the popup in qz at all (I tried multiple times). I’m using version 2.20.21 on Android.
Do you receive the email when you click test login?
I can’t reply to your question below.
> Do you receive the email when you click test login?
No, I didn’t receive an email for these test logins.
However, when I log into Garmin Connect in the browser, I did receive the verification emails.
So the credentials in qz are not correct. Check white spaces on top or bottom and case sensitive
Hi Roberto,
I’m pretty sure the username/password are correct. I copy & pasted them from my password manager.
When I clicked on “OK” (even with blank password). I saw a message saying “Setting Saved! Garmin Connect: Authentication successful” at the bottom of the screen, which doesn’t seem correct.
Share a debug log and I will check it https://github.com/cagnulein/qdomyos-zwift/wiki/How-do-i-get-the-debug-log-in-case-something-doesn't-work%3F
I don’t have any other with the same issue so I guess it’s something about your setup anyway let’s check it
Dear Roberto:
First thank you for developing and distributing the QZ app, which I just bought and installed (18Jan2026). I’m an avid Zwift & Wahoo Kickr V5 & Zwift Play (V1 using two bluetooth channels) & AppleTV user.
In Zwift on Apple TV I have connected all devices (except the Zwift Play) to “Kickr 0000”, which seems the “channel” broadcasted by QZ app for Kickr “Power source”; Kickr “Resistance” and Kickr “Cadence; including my Hear Rate. Those four seem NOT to use a bluetooth channel on Apple TV so the Zwift Play can use the two bluetooth channels on Apple TV.
Everything seems to work, except that 1) cadence often reads irregular and high (eg., 120rpm while I’m only doing 80rpm) and 2) the gears are not really well calibrated: an easy (Zone 2) ride on my “regular Zwift flat road” requires me to be in gear 21; anything lower spins out. [One my Jetblack Victory, the corresponding grear is around 8 or 9, which leaves me plenty of harder — to push higher watts on same Zwift incline —- and easier gears —to keep same watts on Zwift inclines/climbs.]
I have adjusted the “zwift Resistance Offset” from 4 to 20 but it hardly makes a difference. Also, under Wahoo Options, I have set “Preset Gear Profiles” to “Reality Bender (24 even spaced)” based on a Youtube video but whenever I open the app again the “Preset Gear Profiles” is empty and shows “Select a profile”, so perhaps that’s the culprit? I see now “save” button for those settings and just closing the app and reopening doesn’t do it. What am I missing?
Thanks! I answered you by email already
Thanks for this app, first of all, it’s been a game changer. One question – is it possible to have the connection to Strava saved as part of the profile? Right now we need to reconnect every time we switch profile, which is a drag.
I did the code but I can’t find the time to test it https://github.com/cagnulein/qdomyos-zwift/pull/3883